EIC Attributes
Prior to creating an EIC, two EIC specific attributes must be added to CLS360, these are:
-
EIC Number – which will hold the sequential number of the EIC
-
EIC Status – which will hold the current status of the EIC (status values for the EIC status can be assigned by going to the attributes look up tab. See Attributes.
These attribute along with three others, make up the context attributes for the Process template in CL4CL (see CL4CL: Context and Core Attributes). The attributes must be assigned to the Process context attributes prior to creating the first EIC.
Access EIC Explorer
To access the EIC admin page, go to the left-hand side menu and select EIC Explorer, and the EIC admin page will load up.

All EICs can be accessed via the EIC Explorer.

To make it easier to focus on active EICs, Terminated EICs can be filtered using the EIC Explorer. A default setting of 'Lifecycle Status: Active' is applied.

Edit Structure of EIC Explorer
To make it easier to find and view various scopes of work EIC Hierarchies can be created using any data held against the EIC. The Configure Columns option in EIC Explorer works in the same way as the Attribute Explorer view.

To get to relevant EICs easily, the EIC Explorer allows customised views to be saved and rerun as required.

Create a New EIC
To create a new EIC, click on the Create New EIC button
A New EIC dialogue box will appear, populate with the following:
-
CLASS NAME= select from the drop down the type of EIC this is
-
EIC STATUS = select from the drop down the status the EIC is currently at.
-
DESCRIPTION = a brief description of what the EIC is.

The new EIC will now appear at the bottom of the EIC list.
Click on the new EIC to see its details on the right of the screen.
Permissions for Importing and Publishing
To control which users are able to Import or Publish within a specific EIC, there are 2 context attributes that can be set against the process template in CL4CL which will hold the name of the group as defined in ACL360. This will then allow only the users assigned to that group to either import data or publish the EIC.
Create Deliverables
Each EIC can have multiple deliverables assigned to it. To assign a deliverable click on the EIC you wish to add a deliverable too, and the details of the EIC will appear on the right-hand side.
Scroll down through the sections and select Deliverables by clicking on the word in the blue bar. The deliverables section will expand.
Click on the Add Deliverables button, and complete the dialogue box that appears:
-
Document Number = this will be the name of the deliverable, so it could be the name of a register, list, workpack or a general heading like weekly tag load.
-
Responsible Party = the name of the person who is in charge of getting this data into PIM360.
-
Due Date (optional) = the date this deliverable is due.

There is also the option to create multiple deliverables in one go by pasting deliverables into the large text box at the bottom.
To create, press Create.

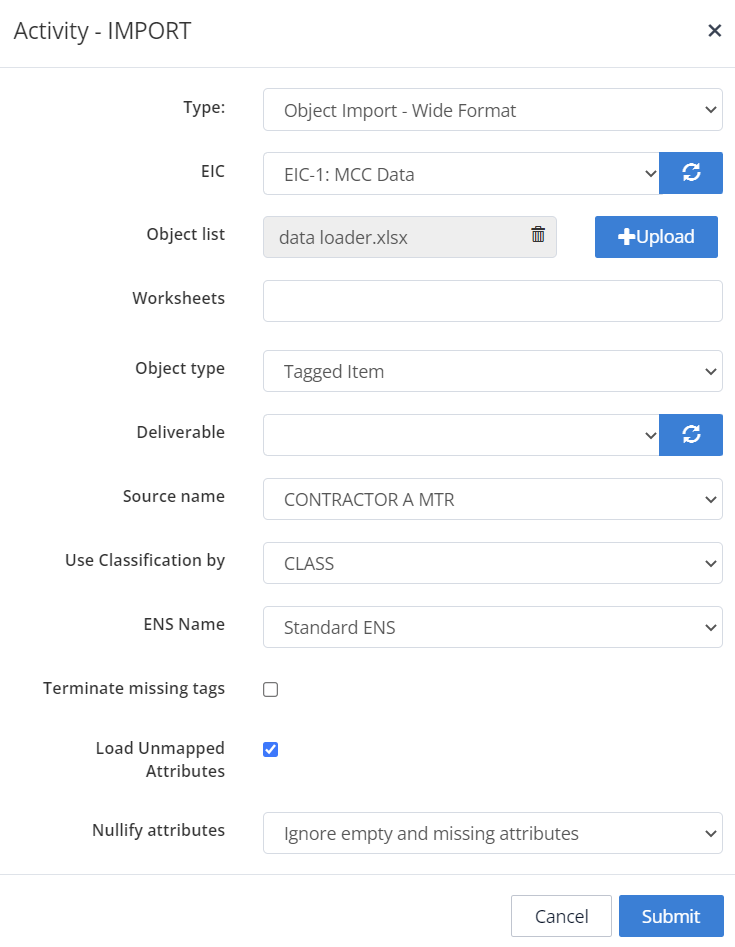
Importing Data via EIC Wide Format
Majority of data imports will use this option as it is the most common structure data is made available in. Typically object IDs (e.g. tags) in the first column with attribute names across the top. Each row contains the data required for a tag.

The Headings required for Wide Import are: Facility, Object ID (i.e. Tag Number or Document Number), Class Name. (These may be labelled differently, depending on how CL4CL has been configured).
To import data via an EIC, select the EIC to import under, and its details will appear on the right-hand side of the screen.
At the top of the EIC details there are four buttons, to import data the Bulk Object Import should be selected. 
The Activity – IMPORT dialogue box wil now appear, and should be filled in as follows:
-
Type = Object Import – Wide Format
-
EIC = this should be populated already with the EIC that you clicked the Bulk Object Import in, if not just use the drop down to select the correct one.
-
Object list = click the +Upload button and navigate to the data load file that is being loaded against this EIC. Either .txt or .xls files can be loaded. If you select an .xls file you will be prompted to specify which worksheets you wish to load.
-
Object type = select the type of object you are loading; Tagged Item is the default.
-
Deliverable = the drop down will show all the deliverables that are available for the EIC chosen in the EIC field. Select the one that is applicable.
-
Source name = this is the name of the ETL Source that has been set up in CLS360 for this load.
-
Use Classification by = the objects can be imported and validated by CLASS (classification), or by ENS (Engineering Numbering Specification), i.e. if ENS is selected, if an objects unique number like tag number does not conform to the tag numbering specification then it will be rejected and not loaded into PIM360.
-
ENS Name = the name of the tag numbering specification that contains the tag number formats for the objects in this data load. If CLASS is chosen in the Use Classification by field, then this field can be ignored.
-
Terminate missing tags = When an object is loaded against an EIC it is then associated with that EIC, and this subset of tags can be manipulated in isolation. The terminate missing tags check box is asking, for all the tags that have been loaded against this EIC, should the ones missing from this current data load file being loaded be removed. Check this box if tags that are not present in the data load file should be removed. Once tags are terminated, they can never be brought back into PIM360.
-
Terminate missing attributes = selecting this option will remove all values in all attributes, that are not in this data load file.
-
Load Unmapped Attributes = when selected this option will allow all the columns in the source file to be loaded into PIM360 even if there is no mapping found in the ETL Source. If left unselected it will only allow columns to be loaded if there is a mapping.
-
Nullify attributes = these options define how any blank values or missing columns are handled.
Click Submit to start to load the data.
Click on the Timeline section to see the progress of the import. From here you will also be able to access the load file, issues file (which lists any problems or things to be aware of with the load), and also a log of changes.

Below is a table detailing the issues/error messages that may appear when loading data
| Error Message in PIM360 | Suggested Corrective Action |
|---|---|
| Facility ID either missing from import file or value is blank | Add or Correct Facility ID |
| Facility ID not found in Lookup Values | Correct Facility ID, or add to Facility Lookup List |
| Object ID either missing from import file or value is blank | Add or Correct Object ID (Tag Number, Document Number, etc) |
| Object is terminated - Use 'Unterminate Item' Import to reactivate | Use 'Unterminate Item' Import, then try again |
| Object class not found | Add or Correct Class |
| ENS Tag Format not valid | Add or Correct Tag Format |
| ENS Tag code mapping not found in Class Library snapshot | Add or Correct Tag Code Mapping |
| ENS Tag Code not mapped to any class | Add or Correct Tag Code Mapping |
| Association value not found in import file | Add or Correct Value |
| Association Object does not exist | Check associated Object exists. Either add the object or correct the import file |
| Not a required attribute | No action required. Can be used to review attiribute requirements |
| Attribute value not found in Lookup Values | Correct value or Lookup List |
| Attribute UoM not valid | Correct value, Add UoM, Map UoM to correct Measure Attribute / Attribute Group |
| ETL Data source selected does not contain an attribute mapping for this attribute | Add Attribute to the ETL mapping used for this Import |
| Multiple conflicting values provided for an attribute | Ensure only one instance of each attribute is being Imported per file/sheet |
| Data Type not valid | Check attribute's Data Type, correct the value or attribute |
Importing Data via EIC Narrow Format
Narrow Format is an alternative to the standard Wide Format import. Where Wide Format imports data as a table, Narrow Format imports data as a list.
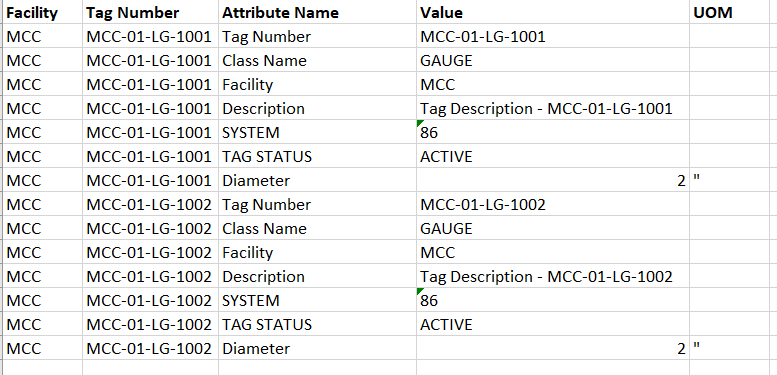
The Headings required for Narrow Import are:
-
Facility
-
Tag Number
-
Attribute Name
-
Value
-
UOM
These may be labelled differently, depending on how CL4CL has been configured. Each row needs the Facility and Tag Number columns to be filled out.
Both the Tag Number and Facility need to appear as rows as well as the columns, as highlighted in the figure below:

To import data via an EIC, follow the instructions as above for Wide Import, with the following change:
- Type: = Object Import – Narrow Format

Remove Items from EIC
Users can remove items from an EIC as long as they have not already been published on that EIC.
Create a load file with the following headings
-
Facility
-
Object Number (Tag, Equipment Item, Model etc.)
Within your chosen EIC select Bulk Object Import

Complete the required fields as per the above screenshot, upload the load file, and submit
Preview Data Changes using Reports and Preview in Liveview
Once the data load file has been processed, the data is not yet live, it is held in a staging area awaiting publication, which allows for a review of the data and to assess the impact of the load.
The items associated with each EIC can be viewed by expanding the Tagged Items on EIC and Documents on EIC Panels in the EIC details panel on the right.

Preview in LiveView
To see the loaded data as it would appear in PIM360 after it is published, select the View Objects button  from the EIC that contains the data to be reviewed.
A dialogue box will appear asking if the results should be shown in LiveView. Click Yes.
LiveView will now load, and any changes to the data will be highlighted as follows:
-
Orange – change.
-
Red – deletion.
-
Green – new object.
Click on any object and see its details on the right-hand side, the changes to the attributes are also highlighted there.

The pending changes are noted against the live values, and where there is a change a warning triangle is shown next to the attribute, and when hovered over, the value that the attribute may change to is displayed.

Source Conflict Report
When two data sources are imported into the same EIC the source conflict report can be ran to show the differences in data in the common attributes.
To access this report, click the EIC to run it against, and select the Report button from within that EIC. 
The Activity – REPORT dialogue box will now appear, complete it as follows:
-
Type = Source Conflict Report.
-
EIC = should already be populated with the EIC number, if not select the correct EIC from the drop down.
Click Submit.
The report will now run and once complete will be avialable to download by selecting downloads in the left hand side menu, and selecting the ran report from the following dialogue box.


Impact Report
The impact report shows pending values that have been imported into the EIC that are different to the live values currently in PIM360.
To access this report, click the EIC to run it against, and select the Report button from within that EIC. 
The Activity – REPORT dialogue box will now appear, complete it as follows:
-
Type = EIC impact report.
-
EIC = should already be populated with the EIC number, if not select the correct EIC from the drop down.
Click Submit.
The report will now run and once complete will be avialable to download by selecting downloads in the left hand side menu, and selecting the ran report from the following dialogue box.
Import Associations via EIC
To associate items to each other (e.g. tag to document or tag to tag such as from and to tag associations) this is also done via an EIC. Select the EIC to import under, and its details will appear on the right-hand side of the screen.
At the top of the EIC details there are four buttons, to import data the Bulk Object Import should be selected. 
The Activity – IMPORT dialogue box wil now appear, and should be filled in as follows:
-
Type = Associations Import
-
Associations file = click the +Upload button and navigate to the associations load file that is being loaded against this EIC.
-
Worksheets = Select the relevant worksheet if you are using an excel file.
-
EIC = this should be populated already with the EIC that you clicked the Bulk Object Import in, if not just use the drop down to select the correct one.
-
From = select the type of object that is in the first 2 columns of your load file.
-
To = select the type of object that is in the last 2 columns of your load file.
-
Terminate missing associations = terminate any associations previously loaded into this EIC that are not included in this import file. Also see section Terminating Objects.
Click Submit to start to load the associations.

Terminating Objects
Users can terminate a specific list of Objects (Tags, Equipment Items, Models etc.)
Create a load file with the following headings
-
Facility
-
Object Number (Tag, Equipment Item, Model etc.)
Within your chosen EIC select Bulk Object Import

Complete the required fields as per the above screenshot, upload the load file, and submit
Un-terminating Objects
Users can un-terminate a specific list of their own Objects (Tags, Equipment Items, Models etc.) if they have been terminated in error
Create a load file with the following headings
-
Facility
-
Object Number (Tag, Equipment Item, Model etc.)
Within your chosen EIC select Bulk Object Import

Complete the required fields as per the above screenshot, upload the load file, and submit
Terminating an Association
An alternative mechanism for removing associations is to use a file that only contains the associations that you want to remove.
Through an EIC select, from the top of the EIC menu buttons, to import data using the Bulk Object Import. 
The Activity – IMPORT dialogue box wil now appear, and should be filled in as follows:
-
Type = Terminate Associations
-
Associations file = click the +Upload button and navigate to the associations load file that is being loaded against this EIC.
-
Worksheets = Select the relevant worksheet if you are using an excel file.
-
EIC = this should be populated already with the EIC that you clicked the Bulk Object Import in, if not just use the drop down to select the correct one.
-
From = select the type of object that is in the first 2 columns of your load file.
-
To = select the type of object that is in the last 2 columns of your load file.
Click Submit to terminate the associations.

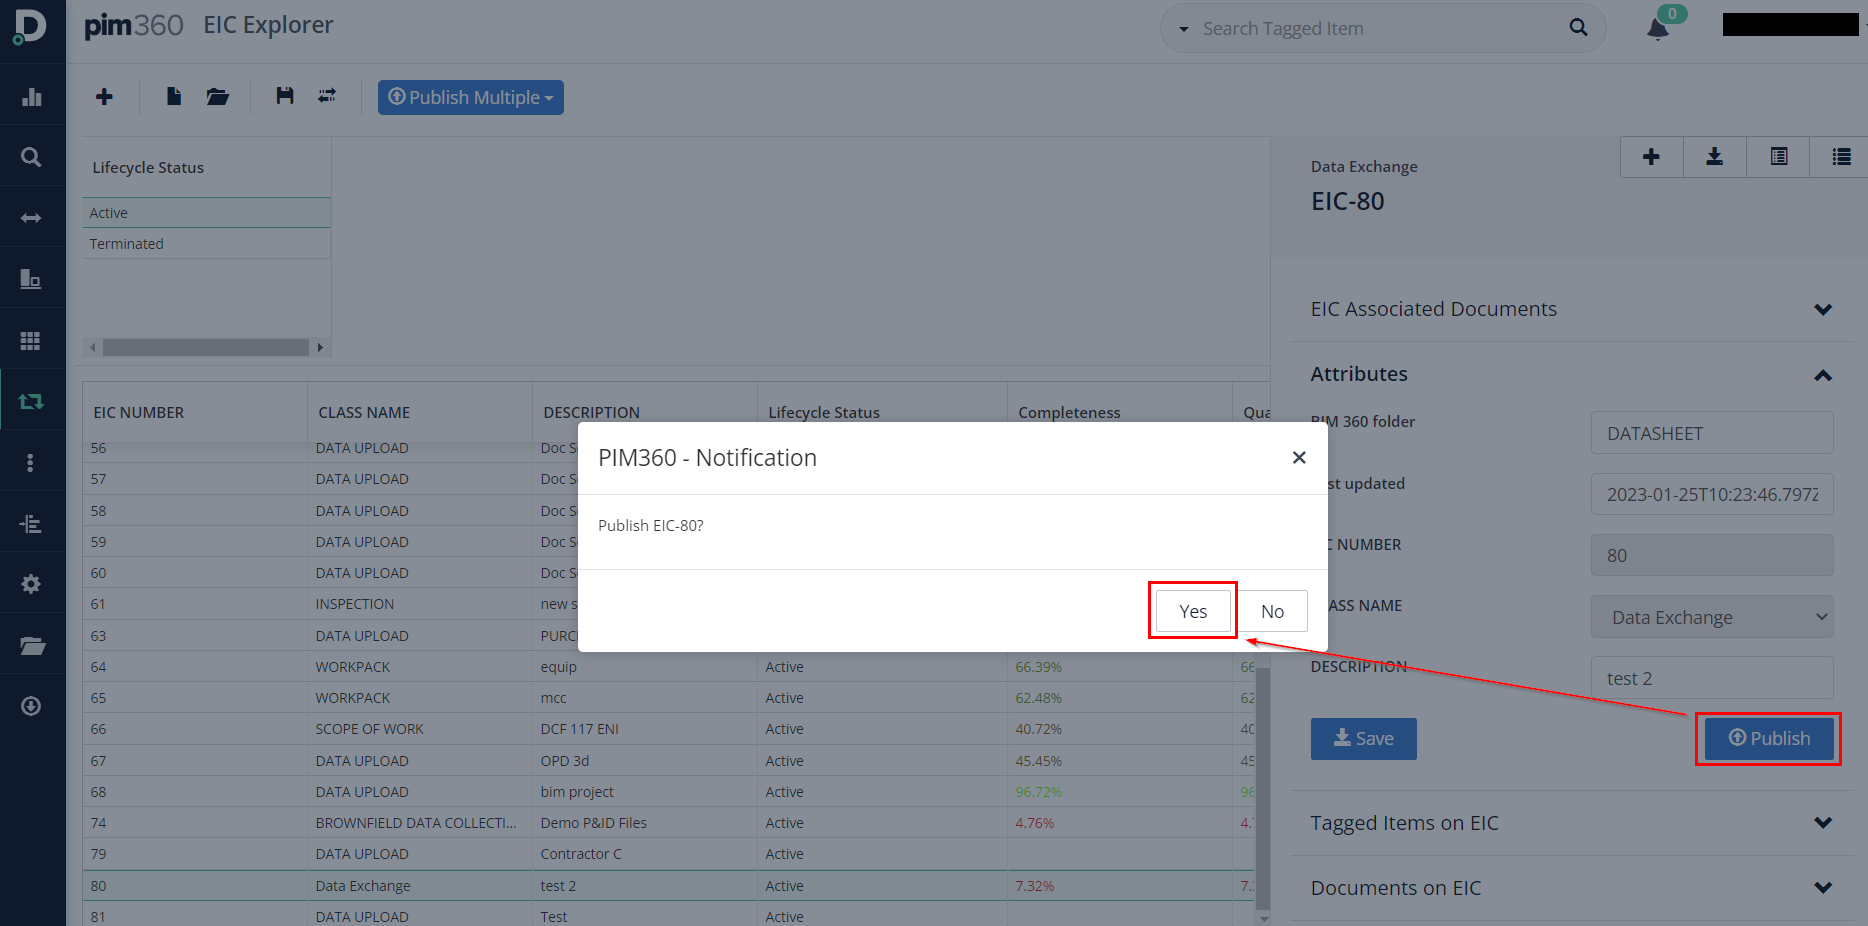
Publish an EIC
Once satisfied that the data loaded against the EIC should go live, then it can be published.
To publish, select the EIC to publish the data against, and its details will appear on the right-hand side.
Click on the Attributes in the blue band to expand the section.
Click on Publish.
To reduce time spent publishing, multiple EICs can be published at the same time using the Publish Multiple button in EIC Explorer.

There are two options:
Publish All, which will publish all of the EICs currently visible in the lower half of the screen

Publish Selected, which will publish those EICs selected in the lower half of the screen. As per standard Windows functionality, clicking on an EIC, holding shift, then clicking on another will select these two and all rows between them. Clicking on an EIC and holding down 'ctrl', then clicking additional EIC will add them to your selection.

After choosing to Publish All or Selected EIC, a window opens that allows you to order the EICs, with the top most being publish first, and the lowest publish last. This is important when EICs contain conflicting values, as the most recent data loaded will be the active value.

Multi-publishes, including publish order, can be scheduled and repeated via the Activity Queue as normal.
To reduce time by avoiding unnecessary publishes, if an EIC with no new data is selected to be pubished, a notification will appear, asking the user to confirm whether they wish to continue.
