Attribute Explorer Overview
The Attribute Explorer allows for user controlled, data driven hierarchies to be built, using attributes stored in PIM360.

Create a Hierarchy
To populate the levels of your hierarchy, click on the Configure Columns action button on toolbar on the top left hand side of the screen. 

Search for the attributes you would like to create your hierarchy out of, on the left hand side, by either utilising the quick search by typing in the first few letters of the attribute you are looking for which will reduce the list below, or by scrolling through the list of available attributes.
Once you have found the attribute you would like, click on it and drag it across to the right hand side of the Edit Structure dialogue.
You can reorder the attributes on the right hand side, by dragging and dropping them into the desired place.
Once finished click “Apply”
Detailed Hierarchy Pane
Once the structure is created, it will be viewable in the top pane of the screen.
Click on an arrow next to an entry to see the next level.

Results Pane
On selecting a row in a column from the created hierarchy in the top pane, the results linked to it will show in the pane below.
There are 2 views in this pane:
- Tagged Items – Shows all the tags that are in the grouping that has been selected in the hierarchy (the example below is showing all the tags in purchase order BC504).

- Summary – provides a count of tags and data completeness in the selected hierarchy.

Active Values View
Next to the “Work with:” drop down, there is the “View” drop down. Where permissions are granted this allows for the user to see data that is loaded into an EIC (Engineering Information Context), that is, information that is due to change pending review. By default, the value is set to Active Values, so unless changed it is the Live and current data that is being viewed.
Save
If the hierarchy created is one that will be used again and again, you can save it.
If you would like to save a view you have created, firstly give it the desired name by clicking on the Save View action button.
If the view should be globally available, check the Public View check box.
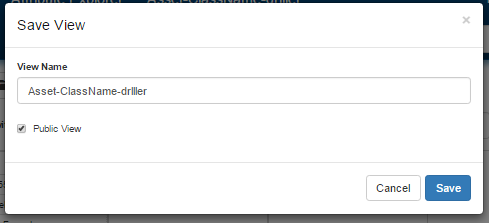
Next click the save button.
To access previously created views, click the Load Saved Views button and the Load View dialogue box will appear
Share a View
It is possible to share a view you have created with another user.
When you saved the view following the steps in Save you then get the below screen where you can either copy and paste the link or click ‘Share via e-mail’ to open a new email message with the link already included.
Open in LiveView
It is possible to view the selected results in a LiveView search. Any of the levels chosen in Attribute Explorer can be viewed in LiveView, to choose the level you want to see, click on the entry that matches your choice, once selected the entry becomes highlighted in blue, and the details appear in the results pane.

Once happy with the selection click the open in LiveView button 
A prompt will appear, asking if the results should be opened in LiveView. On clicking yes a new window will open containing the search results in LiveView, with the selections made in Attribute Explorer carried forward into the conditions pane in LiveView.
